How to screenshot on Mac? Ah, a question that has plagued the minds of countless Mac users, leading to frantic Googling and whispered pleas for tech support. Fear not, intrepid reader! This guide will not only illuminate the path to perfect pixel-capturing but also do so with a healthy dose of amusement. We’ll journey from the simplest screenshot techniques to the most advanced, uncovering secrets that will leave you wondering why you ever struggled.
Prepare for a screenshot saga so captivating, you might just forget to actually take a screenshot.
We’ll cover the basics – those trusty keyboard shortcuts that are your secret weapons in the war against fleeting information. We’ll dissect the mysteries of Shift-3, Shift-4, and the enigmatic Shift-5, revealing their hidden powers and potential for photographic mayhem. Then, we’ll delve into the advanced techniques, exploring scrolling screenshots and the customization options that will make your screenshots truly
-yours*.
Think of it as a screenshot makeover, but for your computer screen. Get ready for a screenshot adventure!
Basic Screenshot Methods on Mac

Capturing images of your screen on a Mac is a surprisingly elegant dance between fingers and keys, a silent ballet of productivity. Mastering these simple shortcuts will elevate your workflow, allowing you to swiftly share information, document processes, or simply preserve a fleeting moment on your digital canvas. Let’s explore the graceful movements involved.
The Mac operating system offers a trio of keyboard shortcuts, each designed for a specific screenshot scenario. These shortcuts are intuitive and efficient, making the process seamless and effortless. Understanding these commands unlocks a level of digital dexterity that will serve you well.
Standard Screenshot Keyboard Shortcuts
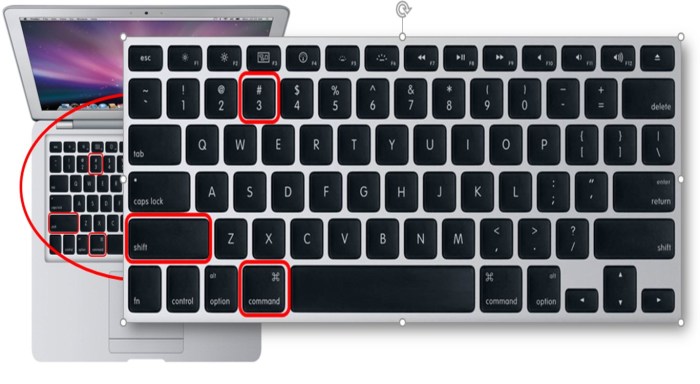
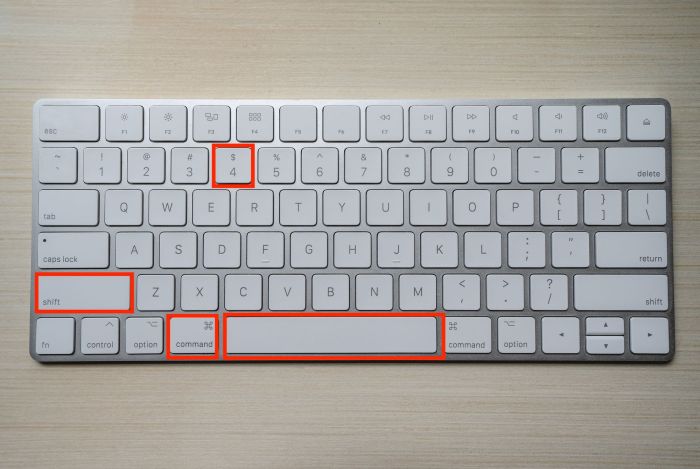
The core of Mac screenshotting lies in three primary key combinations: Shift-Command-3, Shift-Command-4, and Shift-Command-5. Each summons a different screenshot style, offering precision and control over the capture process. These shortcuts can be further refined by adding the Control key to copy the screenshot to the clipboard instead of saving it directly to a file.
Shift-Command-3: A Full Screen Embrace
Pressing Shift-Command-3 simultaneously captures a picture of your entire screen. The resulting image is saved as a PNG file to your desktop, a faithful reproduction of everything visible on your display. Adding the Control key (Shift-Control-Command-3) copies this image to the clipboard instead, ready for pasting into documents or applications. Imagine the elegance: a single keystroke, a complete screen captured, ready for use.
Shift-Command-4: A Precise Selection
Shift-Command-4 transforms your cursor into a crosshair, granting you the power to select a specific rectangular area of your screen. Click and drag to define the region you wish to capture; release the mouse button, and the selected area is saved as a PNG file to your desktop. Again, the Control key (Shift-Control-Command-4) offers the option to copy to the clipboard, bypassing the file save.
This method allows for precise capture of specific elements, eliminating unnecessary background clutter.
Shift-Command-5: A Window’s Portrait, or a Custom Capture
Shift-Command-5 unveils a powerful screenshot utility panel. This panel offers a choice of capturing the entire screen, a selected window, or a specific area, mirroring the functionality of the previous shortcuts. It also provides options for screen recording. After selecting your desired capture method, you can choose to save the screenshot to a file, copy it to the clipboard, or even specify a custom save location.
This option provides the most flexibility and control over your screenshots.
Comparison of Screenshot Methods
| Screenshot Type | Keyboard Shortcut | Image Type | Default Save Location |
|---|---|---|---|
| Entire Screen | Shift-Command-3 | PNG | Desktop |
| Selected Area | Shift-Command-4 | PNG | Desktop |
| Selected Window | Shift-Command-5 (Select Window) | PNG | Desktop |
Advanced Screenshot Techniques

Beyond the basic capture, a world of sophisticated screenshotting awaits, unlocking the power to elegantly document sprawling webpages and meticulously customize your image capture experience. This exploration unveils techniques to seamlessly integrate screenshots into your workflow, transforming them from simple snapshots into integral components of your digital narratives.
Mastering advanced screenshot techniques elevates your digital storytelling capabilities. Imagine effortlessly capturing entire articles, crafting perfectly timed screenshots, or seamlessly integrating visuals into your documents. This section delves into the art of capturing more than just a single screen; it’s about capturing the essence of the digital landscape as you see it.
Capturing Scrolling Screenshots
The challenge of capturing long webpages or documents in a single image is elegantly solved through a combination of built-in macOS features and readily available third-party applications. These tools allow you to transcend the limitations of a single screenshot, creating a cohesive image from a multitude of captured segments.
The built-in screenshot utility, while not directly offering scrolling capture, can be cleverly used in conjunction with other tools or by taking multiple screenshots and stitching them together using image editing software like Preview. Third-party applications, however, offer a more streamlined approach, often providing a single-click solution for capturing entire scrolling content. These applications typically have intuitive interfaces and may offer additional features such as automatic stitching and image optimization.
Customizing Screenshot Options
The built-in screenshot utility offers a degree of customization, allowing users to refine their capture process to suit their specific needs. This includes setting a delay before the capture occurs, ideal for capturing dynamic content or ensuring that the desired elements are perfectly displayed. Furthermore, users can define the default save location for their screenshots, promoting organizational efficiency and ease of access.
To access these options, open the “Screen Recording” section in System Preferences and select “Screenshot”. Here, you can specify a delay, choosing from a range of options such as 2, 5, or 10 seconds. This delay is particularly helpful when capturing content that requires a specific action to be triggered before the screenshot is taken, such as a pop-up window or a specific animation frame.
You can also choose a default save location for your screenshots. This allows you to streamline your workflow by having all your screenshots stored in a central, easily accessible folder.
Incorporating Screenshots into Documents, How to screenshot on mac
Seamlessly integrating screenshots into documents such as Word documents or presentations enhances clarity and visual appeal. This process involves selecting the screenshot file, and then either dragging and dropping it into the document or using the application’s “Insert” or “Image” function. Size and positioning can be adjusted for optimal presentation.
In Microsoft Word, you simply navigate to the “Insert” tab, select “Pictures,” and browse to locate your screenshot. Once inserted, you can resize and reposition the image using the handles that appear around its edges. Similarly, in presentation software like Keynote or PowerPoint, the process is virtually identical; the “Insert” or “Image” function allows for the seamless incorporation of screenshots, enhancing the visual narrative of your presentation.
Troubleshooting Common Screenshot Issues: How To Screenshot On Mac
The seemingly simple act of capturing a screenshot on your Mac can sometimes transform into a frustrating enigma. A phantom error, a missing file, or an image not quite as expected—these are the shadowy figures haunting the digital landscape of the Mac user. Let us illuminate these common pitfalls and guide you through their resolution, restoring order to your screenshotting endeavors.
Understanding the potential problems is the first step towards mastering the art of the perfect screenshot. These issues, though sometimes perplexing, are generally solvable with a little detective work and a few simple adjustments.
Screenshot Files Not Saving
This frustrating scenario, where your perfectly timed capture vanishes into the digital ether, often stems from a few easily rectified causes. Perhaps the designated save location is inaccessible, or maybe the file permissions are inadvertently hindering the save process. It’s also possible that a system error momentarily disrupted the save operation.
Solutions for this common predicament are readily available and often surprisingly straightforward.
- Check the Save Location: Verify that the default screenshot save location (typically the Desktop) is accessible and has sufficient storage space. If you’ve customized the save location, ensure you can access that folder as well.
- Examine File Permissions: Sometimes, file permissions prevent the screenshot from being saved. This is less common but can be checked in the Finder’s Get Info window for the relevant folder.
- Restart Your Mac: A simple restart can often resolve temporary system errors that may be interfering with the save process. This is a classic troubleshooting step for many digital woes.
- Check Disk Space: Ensure your hard drive or SSD has enough free space to accommodate the screenshot. A full drive will prevent any new files from being saved.
Incorrect Image Format
Occasionally, the screenshot may appear in an unexpected or undesirable format. This can be due to incorrect settings within the screenshot utility or a conflict with other applications. The result is an image that is either unusable or doesn’t meet your requirements.
Addressing format issues involves verifying and adjusting your screenshot settings, ensuring a seamless workflow and the desired image output.
- Verify Screenshot Settings: Check your System Preferences to ensure the desired image format (PNG, JPG, etc.) is selected. The default is typically PNG, known for its lossless compression.
- Check for Conflicting Applications: In rare cases, conflicting applications might interfere with the screenshot process, altering the output format. Closing unnecessary applications might resolve the issue.
Unexpected Screenshot Behavior
Sometimes, screenshots may behave unexpectedly – for instance, they might be partially captured, completely blank, or the wrong area of the screen is captured. These issues can be subtle yet profoundly disruptive to workflow.
These inconsistencies often point towards underlying system problems or conflicting applications that are inadvertently interfering with the screenshot process.
- Update macOS: Outdated system software can sometimes lead to unexpected screenshot behavior. Updating to the latest version of macOS often resolves these inconsistencies.
- Check for Conflicting Software: Certain applications might interfere with the screenshot process. Try temporarily disabling or closing potentially conflicting software to see if this resolves the issue.
- Reset Screenshot Shortcuts: If custom keyboard shortcuts are causing issues, reset them to the default settings in System Preferences.
Troubleshooting Flowchart
Step 1: Is the screenshot saved to the expected location? If yes, proceed to Step 4. If no, proceed to Step 2.
Step 2: Check the save location and file permissions. Is there sufficient disk space? If yes, proceed to Step 3. If no, free up disk space and retry.
Step 3: Restart your Mac. If the problem persists, seek further assistance (e.g., Apple Support).
Step 4: Is the screenshot in the correct format? If yes, the issue is resolved. If no, proceed to Step 5.
Step 5: Check and adjust your screenshot settings. If the problem persists, check for conflicting applications.
Step 6: If the screenshot is blank, partially captured, or captures the wrong area, update macOS, check for conflicting software, and consider resetting screenshot shortcuts. If problems persist, consult Apple Support.
So there you have it – a comprehensive, and dare we say, entertaining, guide to conquering the art of the Mac screenshot. You’ve learned the secrets of the keyboard shortcuts, mastered the nuances of scrolling captures, and even tackled the occasional screenshot snafu with the grace of a seasoned pro. Go forth, screenshot warriors, and capture the digital world, one perfectly-timed image at a time.
May your screenshots always be crisp, your captures always clean, and your amusement levels perpetually high.